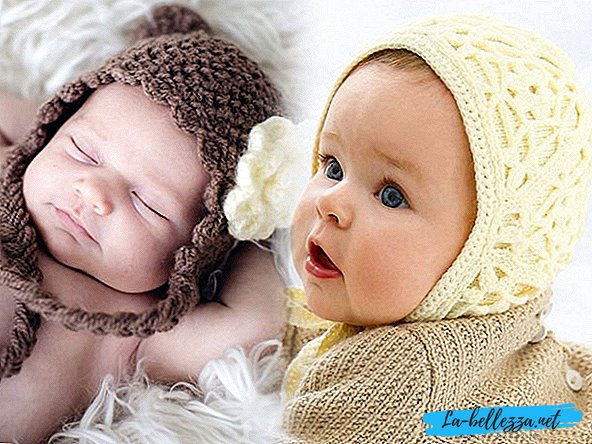
A cap is an integral part of the wardrobe of any newborn, for protection of the head and delicate spring is the primary task that these special hats on ties allow. Such hats for newborns can be purchased, and you can tie your own hands with the help of knitting needles. This is what we are going to do, and charts and descriptions will help in this.
How to tie a cap for newborns: a scheme with a description
There are many models of bonnets, as well as ways of knitting them. You can tie a simple cap, and you can decorate a baby hat for newborns with ruffles, ears, pom-poms. The choice of yarn when knitting a cap for babies is also very important: the threads should be natural, but should not soar and prick. It is important to remember that under the cap of wool yarn still need to wear another cap - made of thin cotton.
Master class for beginners
Knitting a cap with needles for beginners should be a pleasure, so the best option would be to start with a simple model. Consider how to knit cap for newborns with needles from 0 to 3 months. However, if you recalculate the loop, you can link this and for older kids.

The main part of the cap is connected with a simple openwork pattern according to the pattern of the pattern, but you can use other openwork patterns of fine knitting or the front smooth surface. Along the edges of the cap trimming plate, knitted garter. Laces made from yarn are used as ties.
The size:
on the girth of 38 cm.
Materials for work:
- yarn (50% wool, 50% acrylic, 392 m / 100 g) blue - 25 g;
- Knitting needles number 2 and number 2.5.
Knitting density of the main knitting:
Pg = 2.18 loops in 1 cm.
Pattern scheme and knitting method:

The width of the rapport pattern is four loops, eight rows in height. For the pattern of the pattern, the number of loops is a multiple of 4 plus 1 loop and plus 2 edge loops.
1st and 5th row: all loops are facial;
2nd row and all even rows: all loops are purlable;
3 row: 2 front, * nakid, 2 knit stitches together with a slope to the right, 2 facial *, nakid, 2 knit loops together with a slope to the right, 1 facial;
7 row: 2 front, * 2 front, nakidy, 2 knit loops together with a tilt to the right *, 3 front.
Ninth row fit in the same way as the first and so on.
Loop calculation:
The knitting method of this bonnet provides for a head circumference of 38 cm - approximately 1 month of age. However, the head circumference in children varies widely. If you knit a cap on an extract - tie a cap on a smaller one. On average, head circumference in children at birth is 34.1 cm.
In order for the cap to fit the baby in size, it is necessary to bind the pattern with a basic knit (in this case it is a simple lace knit), and determine the density of knitting. In our case, the density of knitting horizontally (G) is equal to 2.18 loops in the 1st cm. To construct the pattern of the cap, you will need one measure - the girth of the head (Og). We will knit a cap on the girth equal to 38 cm. In the calculations we will use a measure in half size, half-grip of the head: Sgol = 19 cm.
Cap pattern:

We start knitting from the face (line AB). The segment AB is calculated by the formula:
AB = 1.5 x Cgol + Pr = 1.5 x 19 + 6 = 34.5 cm,
where Pr = 6 cm is an increase, the same for all sizes.
Now calculate the number of loops that you need to dial the spokes. It is equal to: AB x Pg + 2 edge loops = 34.5 x 2.18 + 2 = 78 loops (rounded to even). Pg - the density of knitting horizontally.
Detail width (segment AA1 = BB1):
AA1 = 0.5 x Cr + Pr = 0.5 x 19 + 2 = 11.5 cm.
Pr - increase, equal to 2 cm for all sizes.
Occipital width (DS)
DS = 0.5 x Cr = 0.5 x 19 = 9.5 cm. Determine the number of loops: 9.5 x Pg = 9.5 x 2.18 = 20 loops (rounded to even).
Working process:
We collect on the spokes (No. 2) 78 loops and knit a 2 cm wide strip (10 rows) with a garter stitch. Next, go to the spokes number 2.5 and knit 9.5 cm main viscous (33 rows). Edge hinges make out pigtails.
Spread 78 loops into three parts so that in the middle there are 20 loops (occipital part). The side parts are obtained by 29 loops. The occipital (central) part will be knitted with a facial surface. In the 34th row (reverse side) we begin to knit the occipital part of the cap as well as the heel of the toe. The loops of the central part continue to knit further, and the loops of the side parts are gradually subtracted, attaching them to the loops of the central part. So, knit loop first and central parts. We knit the last loop of the central part of the classical purl together with the first loop of the third part and turn over the work to the front side. When turning, we remove the first loop as an edge for the front wall, the thread at work, the movement of the spokes away (front to back). On the face side, we knit the last loop of the central part together with the first loop of the side part of the face. An important caveat: we knit these loops behind the back wall (“grandmother's” face loop). We turn the work inside out and remove the edge panel by the front wall, the thread before the work, the movement of the spokes from us (front to back). In this way, we knit the loops only in the central part and reduce the loops from the side parts.
At the bottom, the occipital part is narrowed by 1 - 1.5 cm from both sides. In our case, this is 3 loops on both sides. By tying half the back of the head, we make uniform reductions in the facial rows. We turn down the loops by knitting two loops together with an inclination to the right at the beginning (after the first loop) and at the end of the row (before the last loop). The photo shows the rows in which we are doing subtraction.
Having tied the head, we break the thread, translate the open loops of the central part to an auxiliary needle or pin. Take the needles number 2 and knit strap along the bottom of the garter stitch cap. The loops of the side parts raise one from each edge. The width of the slats - according to the model. We have about 1.5 cm, this is 7 rows. Now you need to make a tie. You can see the master class “How to make ties for the cap”. In our case, the string in the finished form 25 cm, the thread in 6 additions. For one tie, three 75 cm long threads are required.
For girl
Among the many similar to each other models of caps for girls, we can distinguish a way to get an interesting result, namely the combined type of knitting: knitting and crochet. This method allows you to get a really beautiful hat for newborns, combining simple knitting and beautiful crochet openwork motifs. For this, a master class on knitting a cap for a girl described below is useful. A cap for a newborn knitting with a description is useful for both beginners and experienced knitters.

The size:
0 (3) 6 (12) months.
Materials for work:
- Phildar Partner Baby yarn (50% polyamide, 25% wool, 25% acrylic; 192 m / 50 g) - 1 (1) 2 (2) a skein of light yellow (POUSSIN);
- Knitting needles number 2.5;
- hook number 2.5.
Knit the front surface:
Knit (knitting needles No. 2.5): front rows - front loops, purl rows - purl loops.
Knitting density
33 p. X 44 p. = 10 x 10 cm
Pattern:

Working process:
On the needles number 2.5 dial 118 (124) 130 (138) p. And knit facial stitch.
Through 8.5 (9.5) 10.5 (11.5) cm = 38 (42) 46 (50) p. from the initial row close on both sides 1 x 48 (49) 51 (51) p. = 22 (26) 28 (36) p.
Then add in each of the following 2nd p. 5 x 1 p. (5 x 1 p.) 4 x 1 p. (4 x 1 p.), Then in each of the next 4 p. 2 x 1 p. (2 x 1 p.) 3 x 1 p. (3 x 1 p.) = 36 (40) 42 (50) p.
Link 6 (6) 6 (8) p. directly and close on both sides 1 x 1 p., then for the 1st size: in each of the next 6th p. 3 x 1 p., In each of the following 4th p. 3 x 1 p .; for other sizes: in each next 6th p. 4 x 1 p., In each of the next 4 p. 2 x 1 p. = 22 (26) 28 (36) p.
Through 21.5 (23) 24.5 (26) cm = 96 (102) 108 (114) p. from the initial row close all loops.
Triangle (5 parts)
Hook number 2.5 to perform a chain of 8 vp, closed into a ring using 1 conm. Art. in the 1st CE and knit in circular rows.
1st p .: 2 vp lifting instead of the 1st p / st. and 17 p / st., introducing the hook into the ring (= 18 p / ct.). Finish 1 link Art. in the 2nd century lifting.
2nd p .: 3 vp rise instead of 1st st. s / n and 2 tbsp. s / n, tied together (= 3 items. s / n, tied together at the beginning of the series), 5 ce, * 3 tbsp. s / n, tied together, 5 vp *, repeat only 5 times from * to *. Finish 1 link Art. in the 3rd CE lifting.
3rd p .: 3 connections Art., to start from the middle of the arch of 5 vp previous row, * 1 tbsp. c 2 / n (= 4 vp rise instead of the 1st st. c 2 / n), 5 vp and 1 tbsp. from 2 / n to the central loop of the arch of 5 ce, 6 ge, 1 tbsp. b / n to the central loop of the next arch of 5 ce and 6 ge *, repeat only 3 times from * to *. Finish 1 link Art. in the 4th century the beginning of the series.
4th R.: 1 comp. Art., to start with the arch of 5 vp previous row, * in the arch of 5 vp link: 3 tbsp. s / n, tied together, 5 vp, 3 tbsp. с 2 / н, connected together, 5 vp and 3 tbsp. s / n linked together; then 5 VP, 1 tbsp. s / n, 2 ce and 1 tbsp. s / n in art. b / n, 5 ce *, repeat only 3 times from * to *. Finish 1 link Art. in the 3rd CE the beginning of the series.
5th r .: 1 vp rise instead of 1 tbsp. b / n in every ce or art. s / n and 3 tbsp. b / n in 3 tbsp. c 2 / n, connected together. Finish 1 link Art. in ce lifting and complete work.
Half Triangle (2 Details)
Hook number 2.5 to perform a chain of 6 vp, close the ring 1 comp. Art. in the 1st CE and knit in rows in the forward and reverse direction.
1st p .: 2 vp lifting instead of the 1st p / st. and 10 p / st., introducing the hook into the ring (= 11 p / ct.).
2nd p .: 3 vp rise instead of 1st st. s / n, 2 paras, * 3 tbsp. s / n, tied together, 5 vs *, repeat only 2 times from * to *, 3 tbsp. s / n, tied together, 2 vs and 1 tbsp. s / n in the 2nd ce from the beginning of the previous row.
3rd p .: 5 vp rise instead of 1st st. c 3 / n, 2 ce, 1 tbsp. c 2 / n in art. s / n previous row, 6 VP, 1 tbsp. b / n in the central loop of the arch of 5 ce and 6 ge, 1 tbsp. с 2 / н, 5 в.п. and 1 tbsp. from 2 / n to the central loop of the arch of 5 ce and then 6 ce and 1 tbsp. b / n in the 3rd vp beginning of the previous row.
4th R.: 3 vp rise instead of 1st st. s / n, 1 ce, 1 tbsp. s / n in art. b / n previous row, 5 vp, in the arch of 5 vp bind 3 tbsp. s / n, tied together, 5 vp, 3 tbsp. с 2 / н, connected together, 5 vp and 3 tbsp. s / n, connected together, then 5 vp, in Art. b / n link 1 tbsp. s / n, 2 ce and 1 tbsp. s / n, then 5 ce, 3 tbsp. s / n, connected together, in an arch of 2 vp, 5 vp and 2 tbsp. с 2 / н, connected together, in the 5th CE beginning of the previous row.
5th r .: 1 vp rise instead of 1 tbsp. b / n, 1 tbsp. b / n in 2 tbsp. c 2 / n, tied together, then 1 tbsp. b / n in every ce and art. s / n and 3 tbsp. b / n in 3 tbsp. c 2 / n, connected together, and finish the work.
Assembly
Details moisten slightly, stretch as indicated in the pattern and allow to dry. Run the back seam of the cap.
Link 3 p. Art. b / n crochet number 2.5 along the edge around the face. Hook number 2.5 around the edge of the cap and tie the stitches as follows: make a chain of 63 VP, then 1 p. Art. b / n along the edge of the neck of the cap and perform a chain of 63 vp, then tie 3 p. Art. b / n on all loops.
Sew 5 triangles in staggered order to get a slat and 2 halves of a triangle from each edge. Sew on the strap to the cap with a secret stitch. At the end of work all the seams slightly otparit.
For boy
For boys, too, you can tie a beautiful cap. Applying an interesting pattern of knitting patterns and successfully selecting the yarn, you get a true work of art. We will understand how to knit a newborn baby cap quickly and with pleasure.

The size:
0-3 months.
Head circumference:
37-40 cm

Materials for work:
- 1 skein of AlizeBabyWool (40% wool, 40% acrylic, 20% bamboo, 50 g / 175 m.);
- circular and stocking spokes 2.5 mm.
Important: To remove edge loops at the beginning of a row and at the end of a row to knit with purl.
Working process:
Main part
Dial with circular knitting needles 85 loops.
Knit with 1 * 1 elastic band with edge loops - 2.5 cm.
Next, start to knit the main pattern:
1st row (front side): chrome. loop, knit facial to the last loop, chrome. a loop.
2nd row (izn. side): chrome. loop, knit purl to the last loop, chrome. a loop.
3rd row (Face. Side): Krom. loop, * 1 person., 1 out., repeat from * to the last 2 loops, 1 person., chrome. a loop.
4th row (Face. Side): Krom. loop, * 1 out., 1 person., repeat from * to the last 2 loops, 1 out., chrome. loop - i.e. knit loops on the pattern.
Then repeat 1-4 rows for the pattern, only 8 times. Now the height of knitting is 10.5 cm from the typesetting edge.
Back of the head
Knit a series of facial loops. Next, knit:
1st row (izn. side): chrome. loop, 55 out, 2 together out, turn the work.
2nd row (individuals. side): remove the loop, 27 faces., 2 faces together., turn the work.
3rd row (ex. side): remove work, 27 ex., 2 ex. together, turn the work.
4th row (face. side): remove the loop, 27 faces., 2 faces together., turn the work.
Repeat 3-4 rows until you decrease 12 loops on each side of the central 29 loops = 16 loops left on each side.
Next to the decrease of the side loops add the decrease of the central part of the work.
1st row (izn. side): remove the loop, knit purl to loop decrease, 2 wq together, turn the work.
2nd row (face. side): remove the loop, 1 person., 2 persons together. to the left, knit facial up to the last 3 loops before the loop of subtraction, 2 persons together. to the right, 1 person., 2 people together., turn the work.
3rd row (izn. side): remove work, knit purl to loop decrease, 2 wed., turn the work.
4th row (face. side): remove the loop, knit face up to the loop of subtraction, 2 together faces., turn the work.
Repeat 1-4 rows, thus diminishing the center loops in each 4th row, except for the side rows, until 13 loops are left on the spokes.
Peel and hide the thread. Remove the loop on an additional knitting needle.
Bottom trim
Raise 22 loops along the bottom of the bonnet to the pending loops, knit 13 faces. loops with additional knitting needles, lift 22 loops on the other side along the bottom of the bonnet = 57 loops on the needles.
Knit loops front satin, starting from the wrong side - 7 rows.
Track. a row (persons. side): ex. loops.
Knit again the front satin, starting from the wrong side - 8 rows.
Wrap the knitted edge in the wrong side, hem, while closing the loop.
Outlines
Knit up to 5 loops.
Knit 3 rows of the front surface.
Next, knit: * 5 persons., Move the loops to the other end of the knitting needles, repeat from * to the desired length of the cord. Close the loop. Repeat the string on the other side.
Final work
Hide the ends, steam the back of the cap (do not steam the main pattern!).

Video lesson
Video workshops will help to understand the subtleties of knitting caps for kids. These videos often protect against errors and help save time when parsing long descriptions and heavy schemes.
Video: knitting cap for a newborn


