It is not necessary to be an artist to create unique drawings on nails at home.
Having mastered the art of nail art, you will learn how to decorate nails with simple but beautiful drawings.
The well-groomed and uniqueness of your manicure will be appreciated by everyone around.
Nail drawings at home: what is needed for this
To fill your hand, you first need to learn how to make simple drawings. To do this, you need to learn simple techniques and techniques for applying patterns. Uncomplicated pictures will become the basis for beginners in the art of nail art.
Self-designing drawings will require certain tools from you.
Accessories for art painting of nails:
1. Dots or manicure pen - This is a rod with a metal ball at the end. With this tool, you can apply dots, lines, commas to nails, and draw all kinds of ornaments.
This manicure can be replaced with a crochet hook, a simple ballpoint pen, a hairpin with a ball at the end, an orange stick or a regular toothpick.
2. Tweezers Will be needed to create a design with rhinestones and other decorative elements.
3. Brushes made of high-quality synthetic fibers. Thin and flat brushes are indispensable in drawing small parts that require special accuracy and scrupulousness.
4. Decorative materials for nail art:
• varnishes of various colors;
• acrylic and gel paints;
• rhinestones;
• foil;
• glitterin mixes;
• sparkles;
• mother of pearl.
5. Cotton buds needed to eliminate errors when applying varnish.
6. Clear basecoat and fixer.
7. Nail polish remover, cotton pads.
8. Drill for piercing nails.
Using professional tools, you will get more neat nail art at home.
Nail drawings at home: photos and features
Consider the original and simple nail designs that even beginners can perform without any special skills.
Stencil Drawings

Nail art stencils are affordable and easy to use. They are blanks that are fixed on the nails to create neat patterns. The first type of stencils is on an adhesive basis. The workpiece is applied to the nail plate. On top of it, varnish is applied. The second type of stencils works according to the stamp principle. The picture is applied to the nail as a result of the print.
Water Drawings

Modern women of fashion, who are fond of drawings on nails at home, have already managed to master the design using water. Unusual and interesting technology, even a beginner can understand and implement.
To create an original water nail art, you need a glass of cold water. It should be carefully added a drop of various shades of varnishes. Then you need to mix them with a toothpick and send them to the very center of the glass. Now alternately lower the nails so that the varnish covers their surface. Lacquer coating pester in a unique intricate pattern. So that after the procedure the skin remains clean, it must first be lubricated with any vegetable oil.
Traditional and color jacket

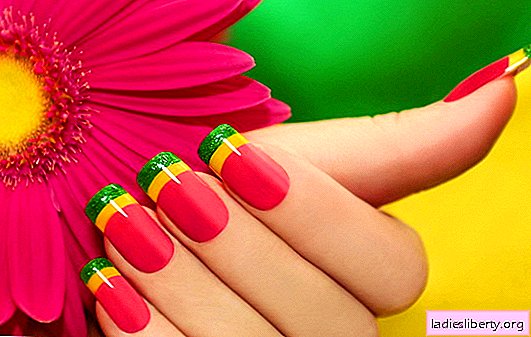
Among the drawings on the nails at home, French manicure does not lose its relevance. He was loved by many women for their romance and versatility. This type of nail design will suit different outfits and will be appropriate for any occasion. A traditional French manicure is created using a pastel shade of varnish and white enamel.
Color jacket looks very stylish and spectacular. The smooth line of the "smile" can be drawn using special stickers.
Lines on the nails

Stripes, lines, zigzags - these are one of the simplest patterns on nails at home. When executed neatly, thin, even or wave-like lines look very original. You can apply them in contrasting colors.
Geometric patterns

Geometric shapes on nails can be done not only manually, but also using appropriate stencils. They are sold in specialized stores or cut out from ordinary tape. Experienced connoisseurs of nail art have enough patience and accuracy, so they use dots to draw patterns.
Flower manicure

Flower drawings are a pretty popular type of nail art among girls. Modest flowers or whole plant compositions will complement any image. According to professionals, it’s easy to paint flowers on the nails, the main thing is to disassemble the technology for creating pictures step by step.
Leopard manicure

This original print will add charm and sexual predation to your everyday look. Fashionable animal manicure looks stylish in a variety of colors.
Nail drawings at home: a sequence of actions
Before you start designing nails, they should be put in order. Even the most fantastic nail art will not bring positive emotions if your cuticle is not processed and your nails are of different lengths. After hygienic manicure, we apply a basic coating on the nails and proceed to the creation of these masterpieces.
Leopard spots: step by step instructions
To create this popular and beloved print you will need the following tools and materials:
• Lucky. Choose colors for the base and spots, depending on individual preferences. You can choose classic brown tones or bright contrasting shades. Any color is suitable for a white base. Mandatory color of the varnish when creating a leopard pattern is black.
• Thin brush. A great alternative to a brush is a dots, a needle or a toothpick. All of these tools can paint beautiful leopard spots.
1. Apply a transparent base to non-fat nails.
2. We cover the nails with two layers of varnish, selected as the background. Let it dry.
3. Using a brush or other tool, draw spots. Dip the tip into the varnish and place them on the surface of the nails in any order. It should be noted that the spots should not be the same size and perfectly round. The uneven edges of the picture give it naturalness.
4. To make the spots look like leopard spots, each of them must be surrounded by black varnish. Do not use straight lines; you need to trace colored spots with jerky movements.

5. When the drawing dries, fixative must be applied to the nails.
Nail art "Red Poppies"

Experts advise to paint poppies with gel paints, since they give a more colorful and elegant result.
1. Apply a base coat to the nails and allow to dry completely.
2. We cover the nails with varnish of the main color. Incredibly gently juicy poppies look on a white background.
3. When the coating dries, proceed to drawing. We take a flat brush and dip it in black varnish on one side, and in red on the other side.
4. We begin to draw the petals. First you need to draw two petals. Do not try to make them perfectly even; on the contrary, it is advisable to distort their shape a little.
5. Draw two more poppy petals. To lighten them slightly, add a small amount of white paint to the tip of the brush.
6. We draw the core of the flower. We put dots in the center. They will imitate the stamen.
7. At the end we create leaflets. Gently green the petals are shaded with a darker color.
Nail art with rhinestones

Each woman can decorate her manicure with rhinestones. For this type of nail art you will need:
• Rhinestones. The shorter the nails, the smaller the size of the rhinestones should be. The modern market offers a wide variety of shapes, sizes and colors of shiny pebbles.
• Glue.
• Nail fixer.
• Toothpick. With it, you will "plant" rhinestones on your nails.
There are two ways to fix the rhinestone on the nails: varnish and glue. Let's consider them in more detail.
1. First you need to cover the nails with a base under the varnish and let it dry.
2. Now paint the nails with two layers of colored varnish.
3. When the varnish coating begins to dry, you should begin to fix the rhinestone. We take a toothpick and wet its tip in water. We catch the rhinestone and carefully put it on the nail. Press lightly.
4. If we use glue, then in the place where the rhinestone will be glued, you need to drop a small drop, and then attach a pebble.
5. Now cover the nails with a nail polish fixer.
Nail Art at Home: Professional Tips
Professional nail art masters, to achieve a neat and beautiful design, recommend using the following tips:
1. In order to make a perfectly straight line out of rhinestones, you need to outline it first. The easiest way is to make a “trace” by applying a regular thread to a dry varnish and quickly removing it.
2. Rhinestones will be better "stick" on a toothpick or orange stick if its tip is dipped in a colorless nail polish.
3. Rhinestones glued to the tip of the nail will hold less than those that are closer to the base of the plate.
4. If you plan to use a large number of crystals, then it is better to focus them on one nail. If you want to decorate each nail, then you do not need to take more than three strasses.
5. Large patterns on the nails at home will look appropriate only on long nails. For short - choose small pictures.
6. You need to start drawing with the little finger, so as not to spoil the already decorated nails.
7. French visually lengthens nails. Light and dark colors of varnishes make nails shorter.
8. During drawing, do only surface movements. This will prevent scratches on the nails.
9. Each new coat of varnish must be thoroughly dried. Coating does not dry instantly. Do not dry it under a stream of air. This “kills” the gloss of the varnish. If there is absolutely no time, then you can speed up the drying process by lowering the nails in cold water.
As you can see, every woman can master drawings on nails at home. Original and unique nail art is not only the attention of others, but also confidence in its attractiveness.